This document is a quick how-to install OpenShift Container Platform on PowerVS using the Cloud private DNS. This is a great way of using your own Enterprise Domain name server instead of dedicating a domain or subdomain on the Cloud.
Configuring the IBM Cloud account for the Installation – Pre-reqs
- Create an IBM Cloud account.
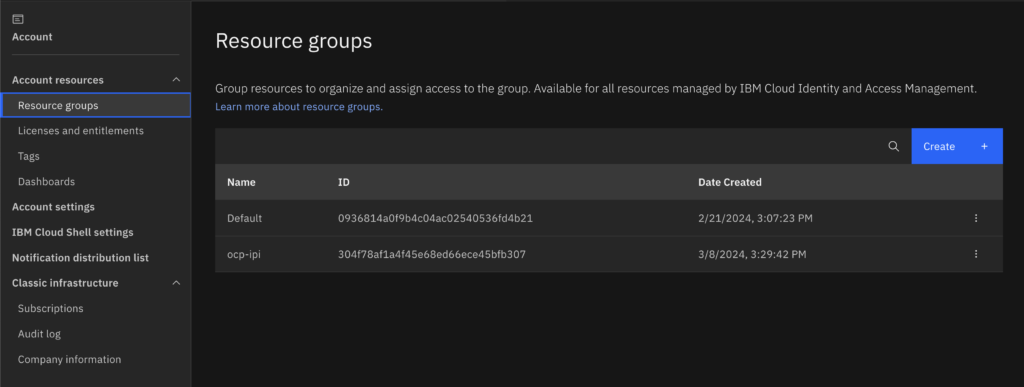
- Create a resource group (you can find this option in Manage -> Account).
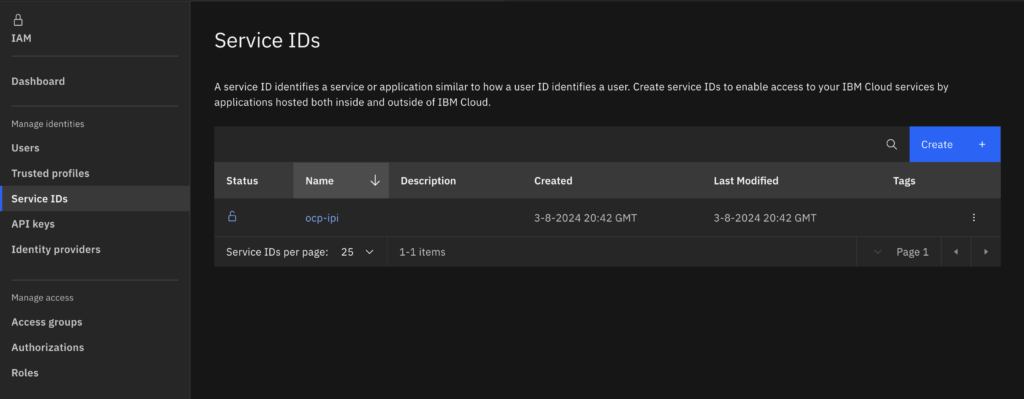
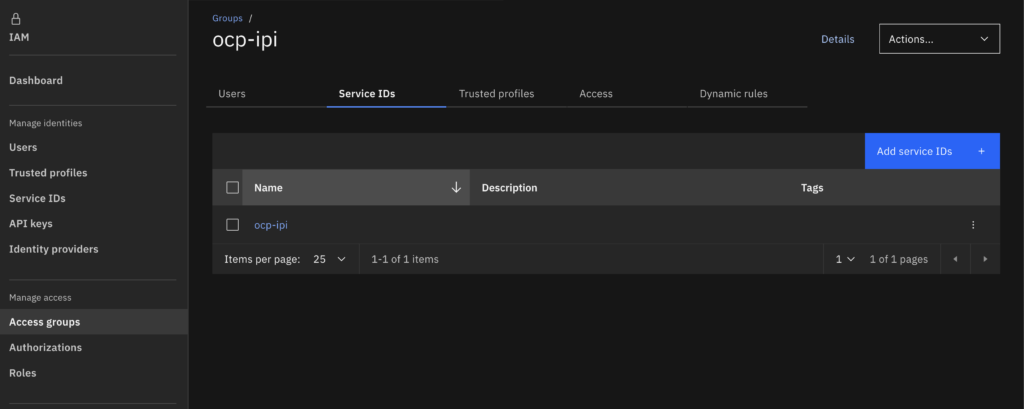
- Create an IBM Cloud service account (highly recommended – do not use the root or a personal account)
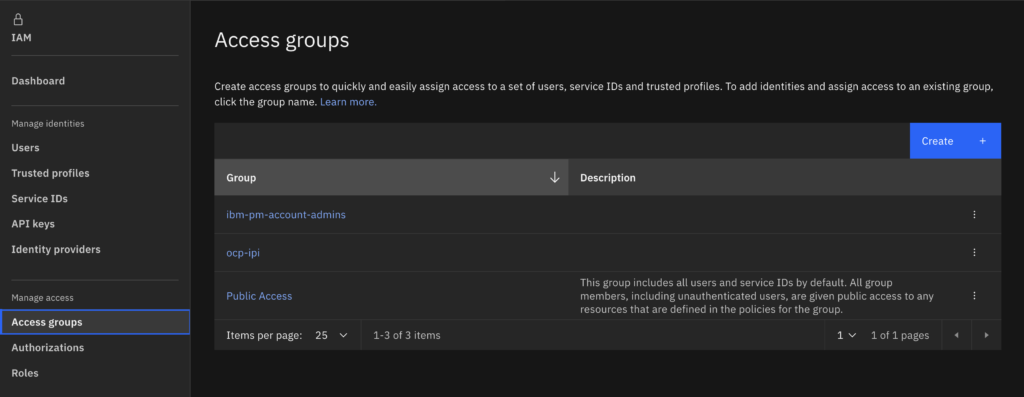
- Create an access group (highly recommended if you want to have different service accounts for different clusters)
- Assign permissions to the access group created, Make sure it matches the bellow:
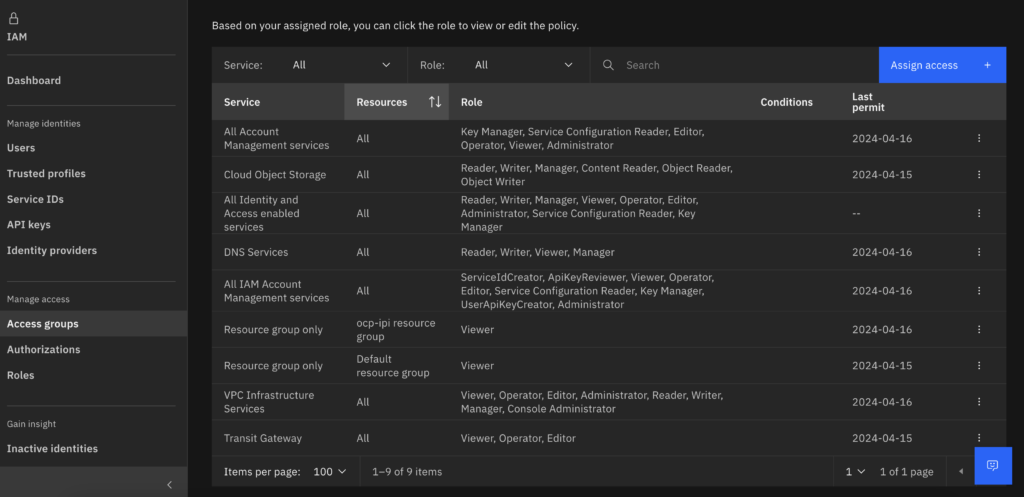
- Add the service account you created to the access group.
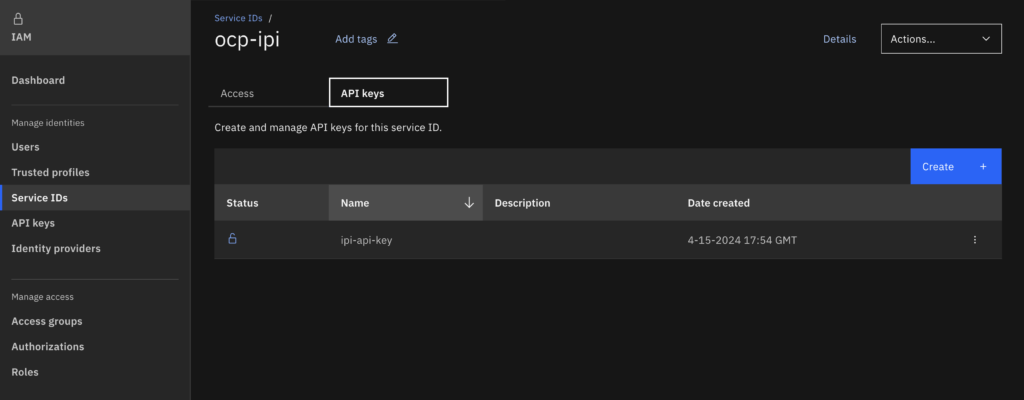
- Create an API key on the service account we are working with, remember to save this in a secure location like a password vault, you will not be able to retrieve it again and will likely have to regenerate it if you lose it.
- Create a Private DNS Zone that you will use for the install, you might need to configure your enterprise DNS server to point to the load balancer CNAME (I will cover that on later steps).
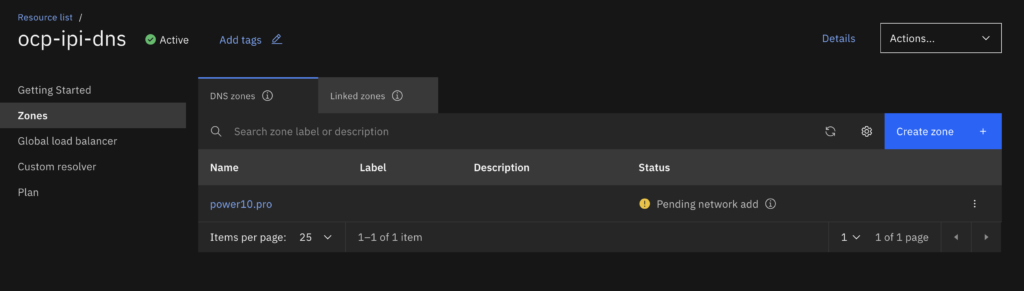
- You might need to activate the DNS zone so you may need to create a Dummy VPC just so you can activate it. Do not leave Pending network add.
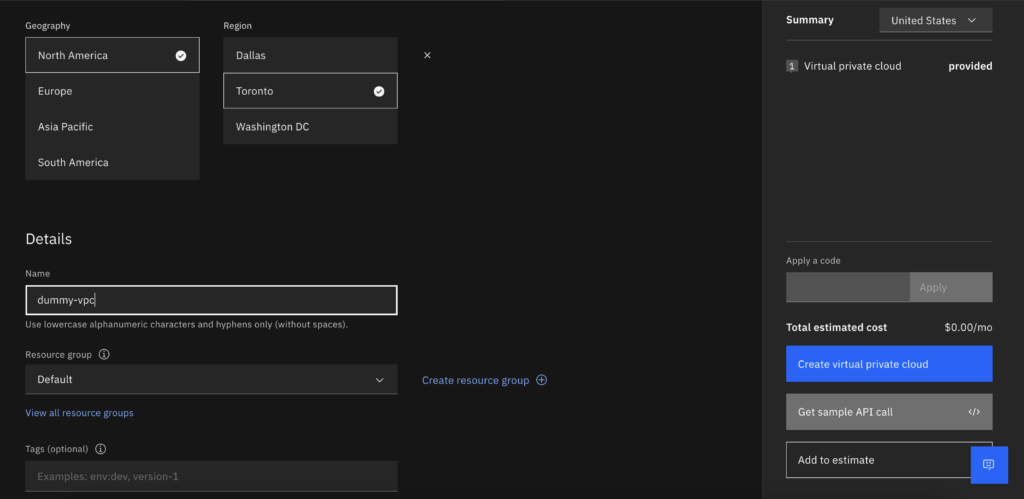
- Go back to the private DNS and add the dummy Network to make the pDNS active.
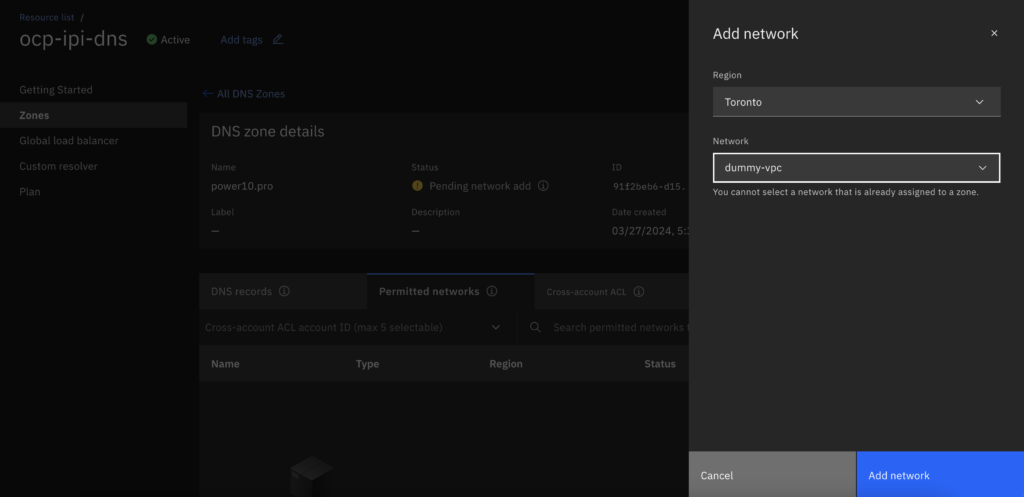
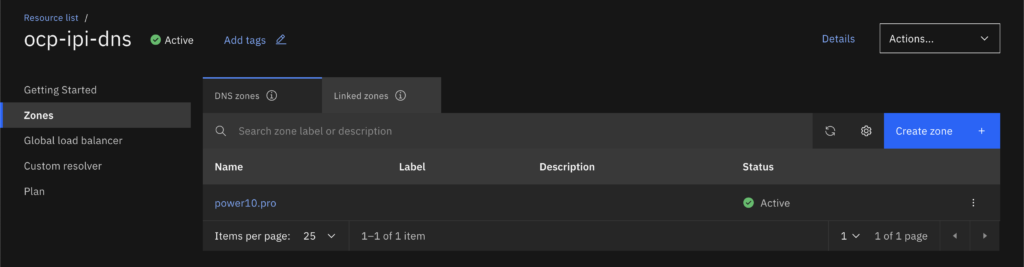
- Make sure it is active
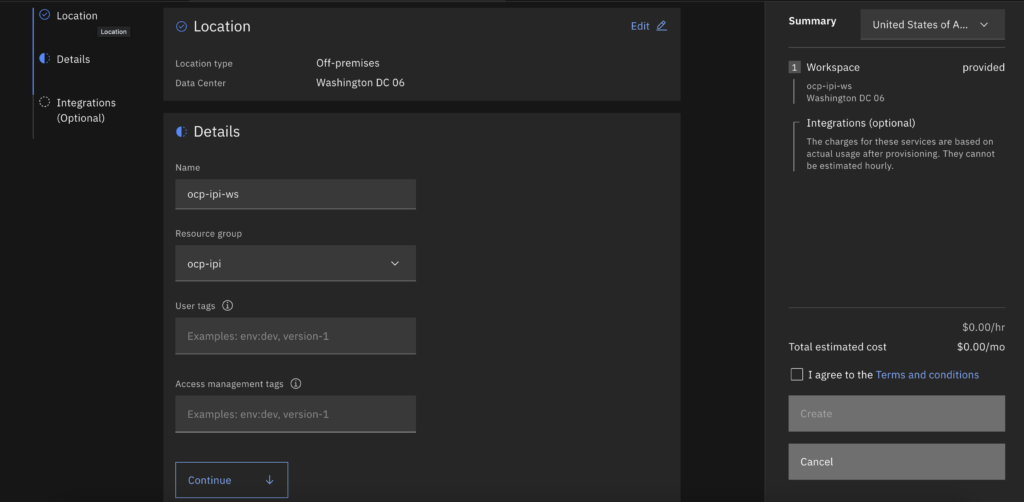
- Create a PowerVS Workspace on the zone you want your cluster to be
Preparing the install host for the OpenShift installation
We will use a VPC server on another Region without transit gateway to show how it would be from a Linux anywhere (even if outside of IBM Cloud would work the same)
- Create a directory to organize all the assets we will use, change to that directory.
mkdir install
cd install
- We need to download the binaries we will use, In the example I am using the OpenShift version 4.15 but you might want to use a newer one if available. We will download the OpenShift Installer, the OpenShift Client and the ccoctl binaries.
curl -O https://mirror.openshift.com/pub/openshift-v4/ppc64le/clients/ocp/stable-4.15/openshift-install-linux-amd64.tar.gz
curl -O https://mirror.openshift.com/pub/openshift-v4/amd64/clients/ocp/stable-4.15/ccoctl-linux.tar.gz
curl -O https://mirror.openshift.com/pub/openshift-v4/amd64/clients/ocp/stable-4.15/openshift-client-linux.tar.gz
- You can install from a amd64 or ppc64le host. I am using a VPC virtual machine to install but you could also do it from a PowerVS Linux server that has access to the internet. or even from a Linux on your own datacenter, as long as you have access to the IBM Cloud. If you use ppc64le architecture installation node, use the binaries bellow instead.
curl -O https://mirror.openshift.com/pub/openshift-v4/ppc64le/clients/ocp/stable-4.15/openshift-install-linux.tar.gz
curl -O https://mirror.openshift.com/pub/openshift-v4/ppc64le/clients/ocp/stable-4.15/ccoctl-linux.tar.gz
curl -O https://mirror.openshift.com/pub/openshift-v4/ppc64le/clients/ocp/stable-4.15/openshift-client-linux.tar.gz
- Decompress the binaries:
tar -xvf openshift-install-linux*.tar.gz
tar -xvf ccoctl-linux.tar.gz
tar -xvf openshift-client-linux.tar.gz
- At this point you should have the following assets on your directory:
[root@install install]# ls
ccoctl               kubectl  openshift-client-linux.tar.gz  openshift-install-linux-amd64.tar.gz
ccoctl-linux.tar.gz  oc       openshift-install              README.md
- Create (you can reuse an existing one) the SSH key to be used to connect to the core user on CoreOS if needed.
ssh-keygen -t rsa
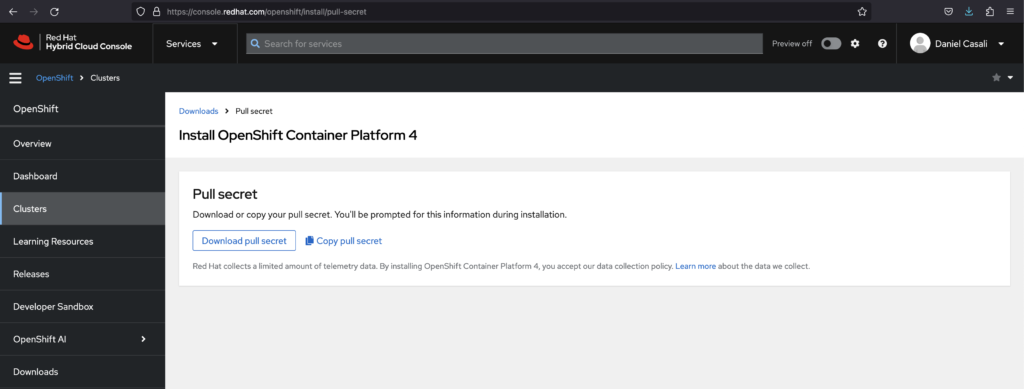
- Download or copy your pull-secret from https://console.redhat.com/openshift/install/pull-secret to use on your install-config.yaml
- Create your install-config.yaml this will be used our example use the ssh key from Item 5. and Pull secret from Item 6.
apiVersion: v1
baseDomain: power10.pro
compute:
- architecture: ppc64le
  hyperthreading: Enabled
  name: worker
  platform:
    powervs:
      smtLevel: 8
      memoryGiB: 8
      processors: 1
      procType: Shared
  replicas: 3
controlPlane:
  architecture: ppc64le
  hyperthreading: Enabled
  name: master
  platform:
    powervs:
      smtLevel: 8
  replicas: 3
metadata:
  creationTimestamp: null
  name: ipi
networking:
  clusterNetwork:
  - cidr: 10.128.0.0/14
    hostPrefix: 23
  machineNetwork:
  - cidr: 192.168.0.0/24
  networkType: OVNKubernetes
  serviceNetwork:
  - 172.30.0.0/16
platform:
  powervs:
    userID: ocp-ipi
    region: wdc
    zone: wdc06
    powervsResourceGroup: "ocp-ipi"
    serviceInstanceGUID: "4cc3b35f-297e-462f-8bae-9c3e47ff6b68"
    vpcRegion : us-east
publish: Internal
pullSecret: '<YOUR PULL SECRET HERE>'
sshKey: '<YOUR SSH KEY HERE>'
- Now you should have this on your directory:
[root@install install]# ls
ccoctl               kubectl                        openshift-install
ccoctl-linux.tar.gz  oc                             openshift-install-linux-amd64.tar.gz
install-config.yaml  openshift-client-linux.tar.gz  README.md
- Create a ~/.powervs directory and create the config.json file. Ignore the awk warnings…
mkdir ~/.powervs
[root@install install]# grep -A5 userID:  install-config.yaml |xargs echo |awk '{print "\{\"id\":\""$2"\",\"region\":\""$4"\",\"zone\":\""$6"\",\"resourcegroup\":\""$8"\"\}"}' > ~/.powervs/config.json
awk: cmd. line:1: warning: escape sequence `\{' treated as plain `{'
awk: cmd. line:1: warning: escape sequence `\}' treated as plain `}'
- You need now to export your API key that I asked you to store on a secure location on Item 7 of the configuring your cloud account section.
export IBMCLOUD_API_KEY=<YOUR API KEY>
- Export the OpenShift installer version, create a folder to hold the credential requests, extract the requests and use ccoctl to create the service ID
RELEASE_IMAGE=$(./openshift-install version | awk '/release image/ {print $3}')
mkdir credreqs
./oc adm release extract --cloud=powervs --credentials-requests $RELEASE_IMAGE --to=./credreqs
./ccoctl ibmcloud create-service-id --credentials-requests-dir ./credreqs --name ocp-ipi --resource-group-name ocp-ipi
- This creates new services IDs at the cloud account and a manifests directory on your installation host.
OpenShift Installation
This is the easiest part of the tutorial.
- Create the additional manifests
[root@install install]# ./openshift-install create manifests
INFO Consuming Install Config from target directory
INFO Manifests created in: manifests and openshift
- Create the cluster
[root@install install]# ./openshift-install create cluster --log-level=debug
INFO Consuming Common Manifests from target directory
INFO Consuming Master Machines from target directory
INFO Consuming OpenShift Install (Manifests) from target directory
INFO Consuming Worker Machines from target directory
INFO Consuming Openshift Manifests from target directory
.
.
.
Before the cluster is created you do have to publish the api and api-int names on your Enterprise DNS specially if you are installing from on-premises. This has to be done between the load balancer creation and before the API test by the installer.
Configure the Enterprise DNS for API access
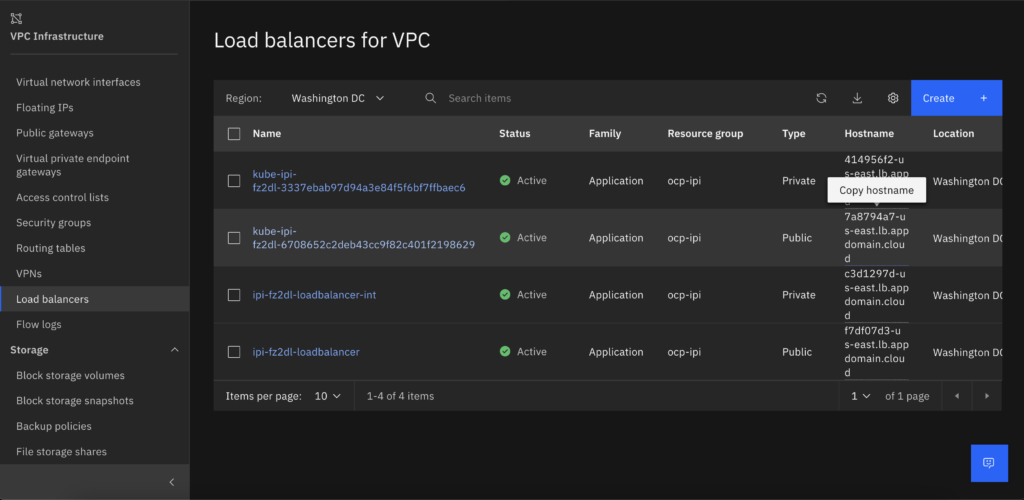
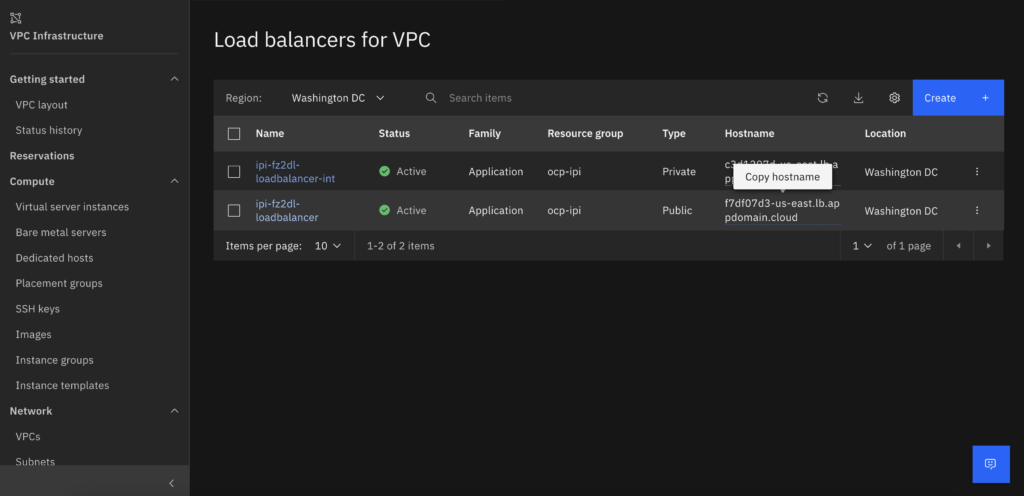
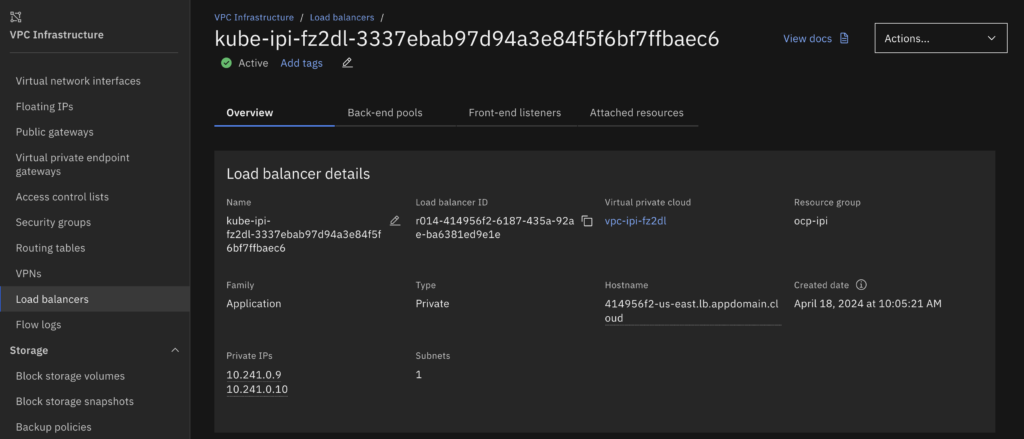
- After the API load balancer is created copy the Public or Private load balancer hostname (depending of your access method) and publish on your enterprise DNS as api.<ClusterName>.<DomainName> and api-int.<ClusterName>.<DomainName>. The default ingress controller will be create at a later time and only as a private DNS. If you want to keep on the safe side publish only the Private one, I need to publish the Public because I don’t have a VPN from my installer Linux to the Cloud environment.
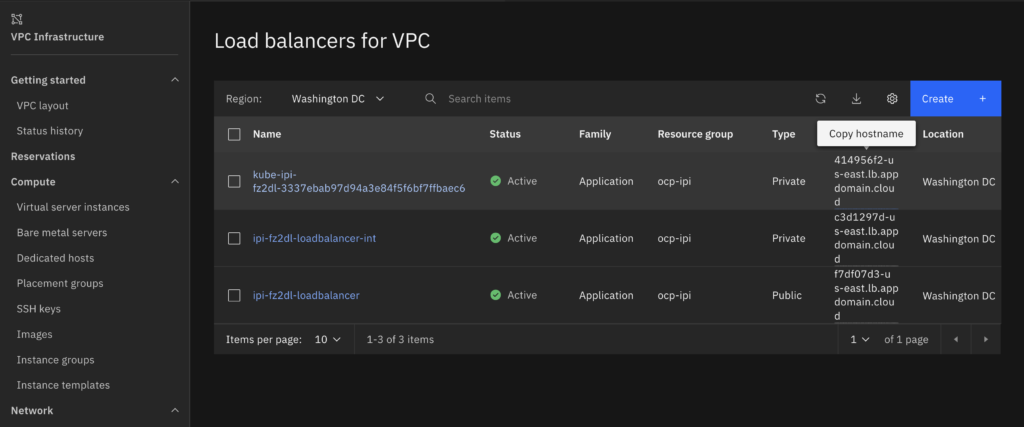
- After the install finishes you will have to publish the apps load balancer on your Enterprise DNS, otherwise you will not be able to access it. After the installation is finished you need to create the ~/.kube directory and copy auth/kubeconfig to ~/.kube/config

Publish your Default ingress controller Privately (Recommended)
- The kube-ipi Private load balancer can only be accessed via Internal IP. You will not be able to access via Internet and that is by design, you can’t use a WAF on the default Ingress Controller so you might want to keep this one internal only and publish the CNAME as the hostname of this private load balancer at your Enterprise DNS Server.
Optional – Publish your default ingress controller publicly.
Think twice before doing this – Optional – Can be Skipped and use another Ingress controller to publish apps (documented bellow).
There may be a need to make your console available on the internet, for example you don’t have a VPN or connection to the internal network, like me. Please note that even maintaining the console private you can still publish apps on the internet and you can even decide which ones will be published externally and internally.
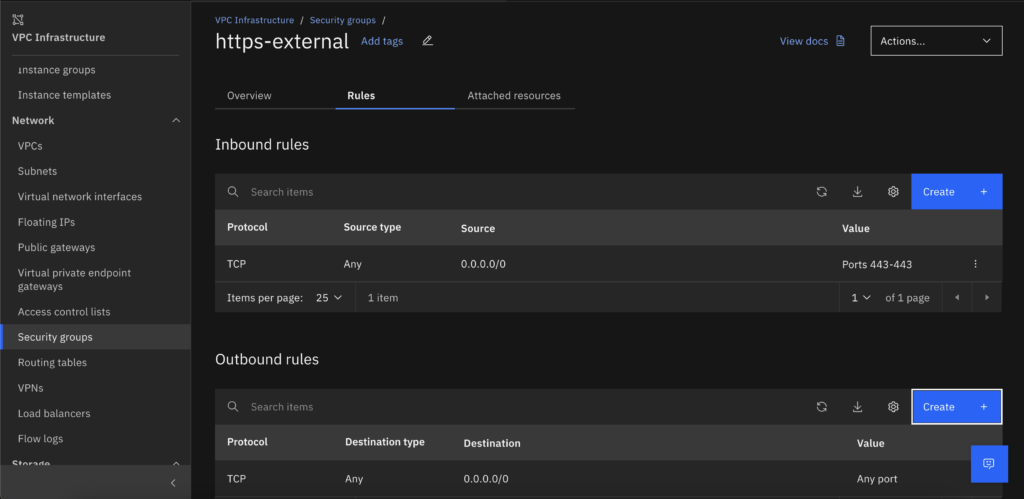
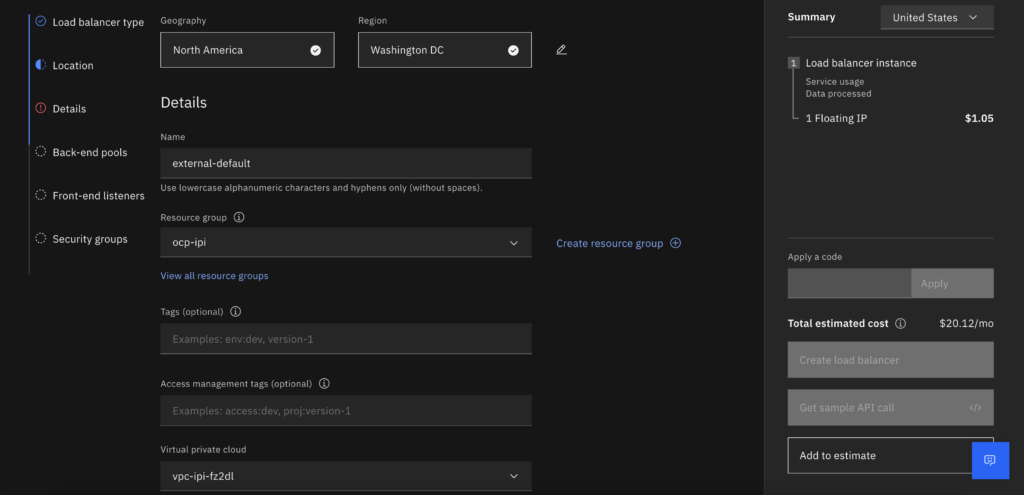
- Create a Security group to allow Inbound to the port 443 ingress from any IP and any port and any IP for Outbound.
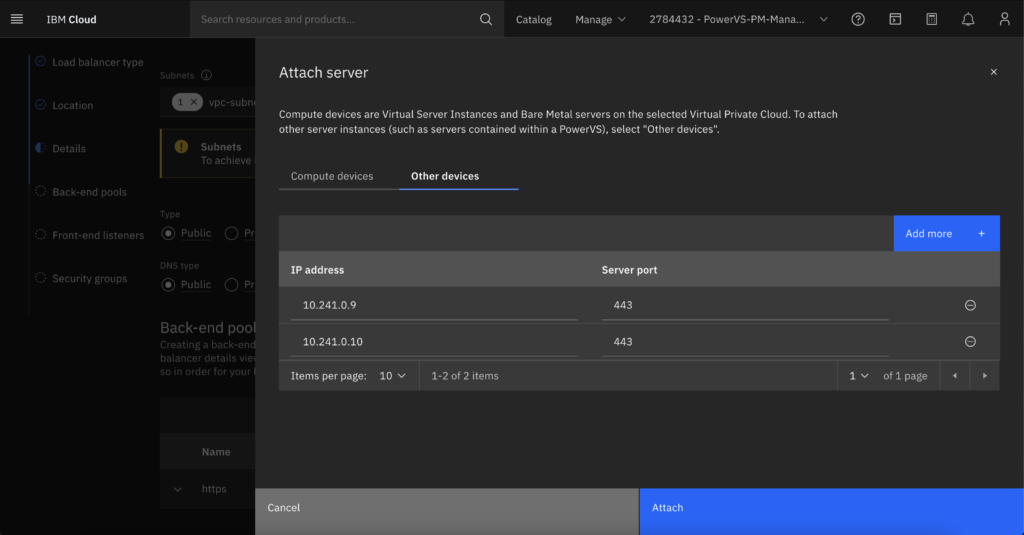
- Copy the Private load balancer IP addresses because we will use it as the backend pool.
- Create an ALB load balancer on the VPC created by the IPI method.
- Select Type: public and DNS type public, click on create pool and add a TCP backend pool
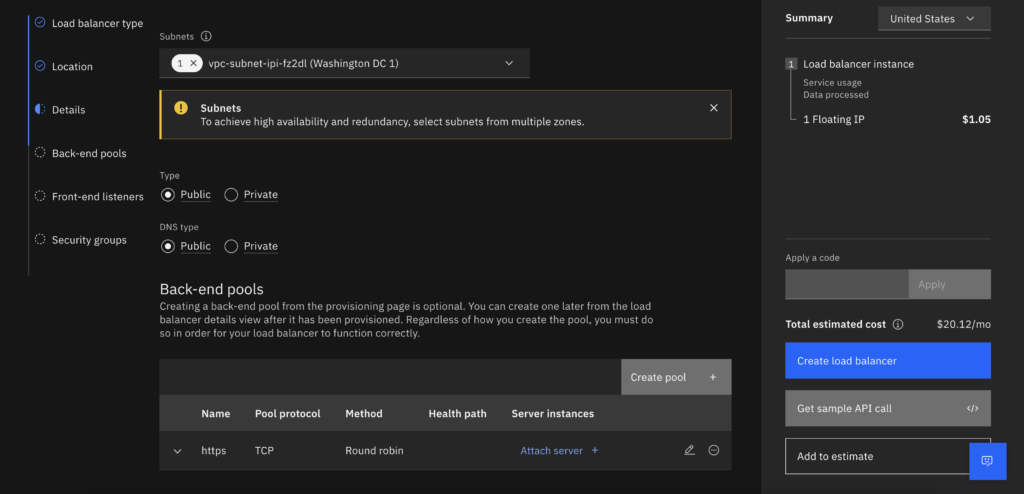
- Click on the attach server and here is where you will add the private IPs we copied during step 2. Use port 443
- Add a TCP front end listener on port 443
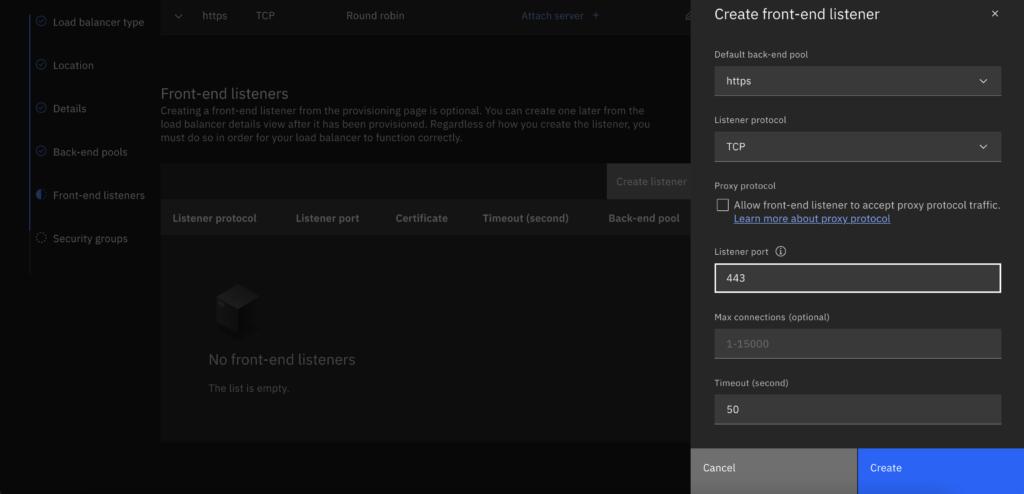
- Choose the security group you created on step 1.
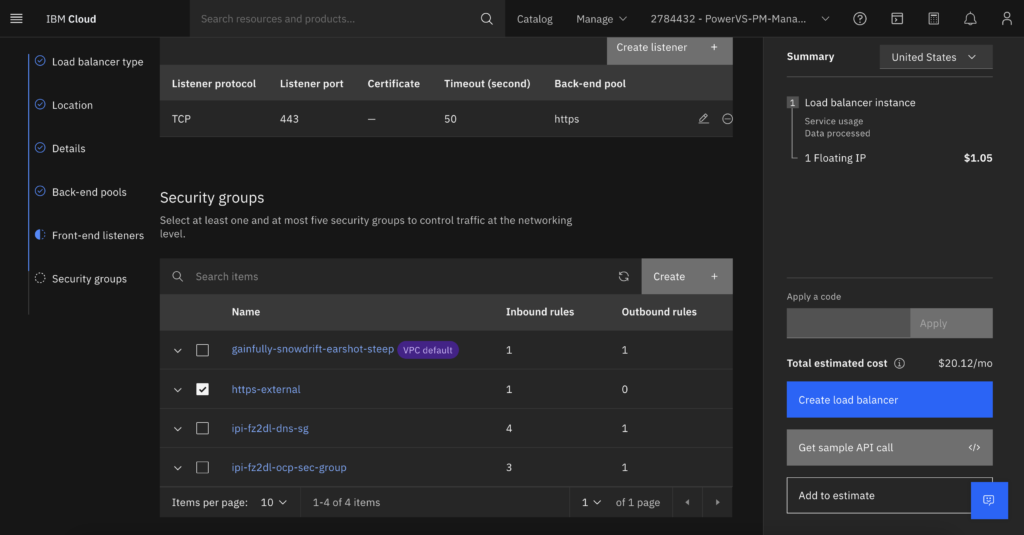
- Click create load balancer, Copy the hostname and publish as a CNAME on your enterprise DNS as *.apps.<ClusterName>.<DomainName>

- After the load-balancer becomes active you can point your browser to: https://console-openshift-console.apps.<ClusterName>.<DomainName>. You might need to accept the Security warnings if you are using the default self signed certificate.
Using a secondary ingress controller for public applications
My preferred option to publish a public available application is using a secondary ingress controller for applications that need public access. This way you can implement Ingress Sharding and only applications that really need exposure will be Internet facing.
Bellow is an example that I used for my environment:
apiVersion: operator.openshift.io/v1
kind: IngressController
metadata:
  name: external
  namespace: openshift-ingress-operator
spec:
  namespaceSelector:
    matchLabels:
      type: external
  domain: ext.ipi.power10.pro
  endpointPublishingStrategy:
    loadBalancer:
      dnsManagementPolicy: Unmanaged
      scope: External
    type: LoadBalancerService
  httpCompression: {}
  httpEmptyRequestsPolicy: Respond
  httpErrorCodePages:
    name: ""
  tuningOptions:
    reloadInterval: 0s
  unsupportedConfigOverrides: null
This will automatically create an external load balancer. Copy the hostname and publish on your Enterprise DNS.